Below is a list of frequently asked questions (FAQs) regarding USB flash drives. If you don’t find the information you’re looking for, please don’t hesitate to contact us !
Bulk Pack USB Flash Drive
To encrypt a thumb drive using a password
- Right-click on the thumb drive in File Explorer and select Turn on BitLocker.
- Choose to use a password to unlock the drive.
- Follow the prompts to set up the encryption and save a recovery key in case you forget the password.
- Once done, the drive will require a password each time it’s accessed on a new computer.
- Open Disk Utility.
- Select the thumb drive and click Erase (back up your data first).
- Choose Mac OS Extended (Journaled, Encrypted) as the format.
- Set a password during the formatting process.
- Download and install VeraCrypt from its official website.
- Create a new encrypted volume and choose Create an encrypted file container.
- Set a password for the encrypted volume and follow the wizard to format the thumb drive.
- The drive will now be password-protected.
The Actual Storage Vs. The Label Storage
Why Does the Actual Storage Differ from the Labelled Capacity?
When assessing storage capacity, it’s common to see a discrepancy between the labeled storage and the actual usable storage. This is due to different definitions of a Megabyte (MB) used by operating systems and flash memory manufacturers. Here’s an explanation of why this happens:
Definitions of a Megabyte (MB)
- Operating System Definition (Binary):
- Kilobyte (KB): 1,024 bytes (2¹⁰)
- Megabyte (MB): 1,048,576 bytes (1,024 × 1,024 = 2²⁰)
- Gigabyte (GB): 1,073,741,824 bytes (1,024 × 1,024 × 1,024 = 2³⁰)
- Flash Memory and Disk Drive Manufacturer Definition (Decimal):
- Kilobyte (KB): 1,000 bytes
- Megabyte (MB): 1,000,000 bytes
- Gigabyte (GB): 1,000,000,000 bytes
Impact on Reported Capacity
Operating systems calculate storage using binary units, while flash memory manufacturers use decimal units. As a result, the actual usable storage appears less than the capacity listed by manufacturers. This is a natural consequence of the difference in measurement systems, not a defect in the product.
Example:
- A 16GB USB flash drive (16,000,000,000 bytes) will show as approximately 14.9GB on the operating system, based on the binary calculation:
16,000,000,000 ÷ 1,073,741,824 = 14.9GB.
This discrepancy is typical and can be explained by understanding the differing measurement standards used by operating systems and manufacturers. By knowing these definitions, users can better understand and interpret the actual storage capacity of their devices.
The LED light on blue & black USB
All SWIVEL USB drives are equipped with an LED light embedded in the PCB board. For units with blue or black casings, the harder material makes it challenging for the light to pass through the casing. As a result, the LED light is most visible from the hole at the end of the case, while it may appear faintly around the sides.
Shipping and delivery issue for FBA orders
| Destination Country | Standard Shipping (business days) | Two-Day Shipping (business days) | One-Day Shipping (business days) |
|---|---|---|---|
| Contiguous U.S. | 4 to 5 | Within 2 | Within 1 |
Warranty for Enfain® products
Discount for USB pack with large quantities?
Custom Orders
Custom USB Flash Drives: Artwork Requirements To ensure the highest quality for your custom USB flash drive design, we request that you submit artwork in specific file formats. Using the correct format guarantees sharp, scalable graphics and optimal compatibility. For the best results, we require vector-based files as they offer crisp, scalable graphics without any loss of resolution. These formats include: If vector artwork is unavailable, we can work with high-resolution bitmap images. Acceptable formats include: Please ensure the image is of sufficient resolution to maintain clarity during the printing or engraving process. For designs consisting solely of text, please provide the text along with details on the preferred fonts, font sizes, and colors. This will help us accurately capture your vision and produce the perfect final product. Once we receive your artwork, we will create a digital proof of your design, free of charge. We will send the proof to you within 1 business day for review and approval before we begin production. This ensures the final product aligns with your expectations. We could print or engrave your logo on the USB drives. You may refer to page ” custom USB“.Artworks request
Preferred File Formats:
Alternative File Formats:
Text-Only Designs:
Design Proof:
Shipping and delivery issue for custom USB orders
Print logo and time schedule?

Troubleshooters
Delete the Partition on a MacBook Pro
If you’re dealing with flash drives that have a partition format that prevents you from reformatting or deleting them. If you’ve tried standard reformatting and partition deletion methods but haven’t succeeded, you can try the following more advanced steps using Disk Utility and the Terminal on your MacBook Pro. This will allow you to erase or reformat the drives completely, including removing any partitions that might be stuck.
Steps to Delete the Partition on a MacBook Pro
Method 1: Using Disk Utility
- Open Disk Utility:
- Click the Apple Menu in the top left corner of the screen.
- Select About This Mac → System Report → Storage.
- You can also open Disk Utility by searching for it in Spotlight (press
Cmd + Spaceand type Disk Utility).
- Select the Flash Drive:
- In the Disk Utility sidebar, find the 2GB or 1GB flash drive you want to reformat.
- Important: Ensure you select the device (not the volume or partition) in the sidebar. The device will be listed at the top of the drive’s name, and the partitions will be indented below it.
- Erase the Drive:
- Click on the Erase button at the top of the Disk Utility window.
- Set the format to exFAT or MS-DOS (FAT) (if you intend to use it on both Mac and Windows).
- Name the drive if you want.
- Click Erase and allow the process to complete.
- Remove Partitions (if necessary):
- If the drive has multiple partitions (which could be part of the issue), click on the Partition tab at the top of the window.
- Select any partitions listed and click the minus (-) button to delete them.
- Once you have deleted all partitions, click Apply.
- Check the Drive:
- Once the process is complete, the drive should be ready to use. If it still shows an issue, proceed to Method 2.
Method 2: Using Terminal (for deeper problems)
If Disk Utility doesn’t work and the drive still has issues, you can use Terminal to completely wipe the drive and remove any partitions.
- Open Terminal:
- Go to Applications → Utilities → Terminal or search for Terminal via Spotlight.
- List the Drives:
- In the Terminal, type the following command to list all drives connected to your Mac:
diskutil list - This will show you all connected drives and their partitions. Find the disk identifier for your flash drive (for example,
/dev/disk2).
- In the Terminal, type the following command to list all drives connected to your Mac:
- Unmount the Flash Drive:
- Before erasing or deleting partitions, unmount the drive. Replace
diskXwith the identifier for your flash drive (e.g.,disk2):sudo diskutil unmountDisk /dev/diskX
- Before erasing or deleting partitions, unmount the drive. Replace
- Erase the Drive:
- Now, to completely wipe the drive and remove all partitions, run the following command:
sudo diskutil eraseDisk FAT32 MYDRIVE MBRFormat /dev/diskX- FAT32 is just an example. You can replace it with exFAT or MS-DOS (FAT) depending on your needs.
- Replace
MYDRIVEwith the name you want to give your drive. - Replace
/dev/diskXwith the actual identifier of your flash drive.
- Now, to completely wipe the drive and remove all partitions, run the following command:
- Confirm the Process:
- Terminal will ask you to confirm the operation. Type your administrator password and press Enter.
- Reformat the Drive:
- After running the above command, the drive should be completely wiped, and any partitions should be removed.
- You can then reformat the drive in Disk Utility if needed.
Final Thoughts
- Be cautious: These operations will completely erase all data on the drives, so make sure to back up anything important beforehand.
The computer said the disk is not readable. Why?
When a USB flash drive becomes unreadable after adding files, several potential issues could be causing the problem. Here’s a breakdown of the most common reasons and how to address them:
1. File System Corruption
- Cause: Sudden disconnection of the USB drive, power failure, or an interrupted write process.
- Solution:
- Windows:
- Plug the USB into your computer, go to This PC > Right-click on the USB drive > Properties > Tools > Error Checking.
- Mac:
- Open Disk Utility, select the USB drive, and click First Aid to repair the drive.
- Windows:
2. Incompatible File System
- Cause: The USB drive may use a file system (e.g., NTFS, exFAT, or FAT32) incompatible with the current operating system or device.
- Solution:
- Connect the USB drive to a device that supports its file system and check compatibility.
- If reformatting is needed, back up data first (if possible).
3. Corrupted Files
- Cause: A specific file added to the drive might be corrupt or too large for the file system’s capacity (e.g., FAT32 has a 4GB file size limit).
- Solution:
- Check the files on a different device or use data recovery software to retrieve them before reformatting.
4. Drive Capacity Issue
- Cause: The USB drive might be over capacity or nearing its storage limit, leading to instability.
- Solution:
- Verify the actual storage capacity of the drive using tools like H2testw (Windows) or F3 (Linux/Mac).
- Some counterfeit drives misreport their storage capacity.
5. Physical Damage or Wear
- Cause: USB drives have a limited number of write/erase cycles, and frequent use may lead to wear. Physical damage or a loose connection could also make the drive unreadable.
- Solution:
- Inspect the USB drive for physical damage.
- Try connecting it to a different USB port or computer.
6. Virus or Malware
- Cause: Malware can corrupt the drive or make it unreadable.
- Solution:
- Use antivirus software to scan the drive for malware.
7. Driver or Operating System Issue
- Cause: Outdated or missing drivers on the computer can cause USB drives to become unreadable.
- Solution:
- Update the USB drivers through the Device Manager (Windows).
- Restart the computer or try the drive on another system.
If none of these solutions work and the data is critical, consider using professional data recovery services.
If your thumb drive isn’t working after encryption
If your thumb drive isn’t working after encryption, there could be several potential causes. Here are some common reasons:
1. Encryption Software Compatibility Issues
Software Conflict: If you’re using third-party encryption software (like VeraCrypt, BitLocker, or others), the drive might not work on another computer that doesn’t have the same encryption software installed. Always ensure that the software is compatible with other systems.
File System Formatting: When you encrypt a drive, it might reformat the file system (for example, using NTFS or exFAT), making the drive unreadable on devices that don’t support the format.
2. Incorrect Password
Password Issues: If the password was entered incorrectly or if there’s an issue with the password recovery options (in case you’ve forgotten the password), the drive may seem to be unresponsive. Always ensure that the password is correct and carefully note any recovery keys provided during the encryption setup.
3. Drive Corruption During Encryption
Data Corruption: If there was an interruption or error during the encryption process (e.g., sudden power loss, accidental disconnection, or software malfunction), it could cause corruption on the drive, making it inaccessible.
Formatting Errors: If the thumb drive was formatted incorrectly during the encryption setup, it might render the drive unusable. For example, selecting an incompatible file system or setting encryption incorrectly could cause the drive to become unreadable.
4. Encryption Software Bugs
Software Glitch: Encryption software, especially open-source or beta versions, may have bugs that can result in drive inaccessibility or failed encryption. Always use the most updated version of the software to minimize this risk.
5. Hardware Issues
Faulty USB Port or Cable: Sometimes, the issue may not be related to encryption at all. A malfunctioning USB port or cable can cause the drive to fail to appear on the computer after encryption.
Troubleshooting Steps:
- Try the drive on another computer: If you encrypted it using specific software (e.g., VeraCrypt or BitLocker), ensure that the other computer has the same software installed.
- Check for software recovery options: Some encryption tools allow you to recover or reset the password if you’ve forgotten it.
- Reformat the drive (if data loss is not a concern): Reformatting the drive can resolve any file system corruption or formatting issues.
- Use a disk repair tool: Tools like chkdsk on Windows or Disk Utility on macOS can help check and repair a corrupted USB drive.
Make sure to always back up your data before encrypting to avoid permanent data loss.
T10. USB Flash Drives for TV
USB flash drives are increasingly being used with TVs for convenient access to video, audio, and image files. This setup allows users to enjoy their media files directly on their TV screens without additional devices.
However, there are times when a TV fails to recognize the files on a USB flash drive. What could be causing this issue? Typically, it boils down to two common compatibility problems:
- USB Device Format Incompatibility: The file system format of the USB drive (e.g., FAT32, exFAT, or NTFS) may not be supported by the TV.
- Media File Format Incompatibility: The media files (e.g., video, audio, or image formats) on the USB drive may not match the TV’s supported file formats.
To resolve this, it’s essential to determine which USB file systems and media file types are supported by your TV.
To make it easier, we’ve compiled a detailed guide covering the compatibility requirements for popular TV brands, including Sony, Samsung, VIZIO, and TCL.
This resource will help you troubleshoot and enjoy seamless playback of your media files on your TV.
-
-
USB Flash Drives for Sony TV
Supported Video type: .mpg, .m2t;
Supported Music: .MP3;
Supported Image: .jpg, .jpeg -
USB for SAMSUNG TV
Your Samsung TV supports a large range of Picture, Video, and Music file types. There are some restriction to the file types (resolution, codec, frame rates, bit rate, etc) which can be found in the charts below. However, there are no limitations to file size.
Supported “Picture” File Formats
File ExtensionTypeMax Resolution*.jpg; *.jpegJPEG15360 x 8640*.pngPNG4096 x 4096*.bmpBMP4096 x 4096*.mpoMPO15360 x 8640Supported “Music” File Formats
File ExtensionTypeCodecComments*.mp3MPEGMPEG1 Audio Layer 3*.m4a*.mpa*.aacMPEG4AAC*.flacFLACFLACSupports up to 2 channel*.oggOGGVorbisSupports up to 2 channel*.wmaWMAWMAWMA 10 Pro supports up to 5.1 channel. WMA lossless audio is not supported. Supports up to M2 profile*.wavwavwav*.mid*.midimidimiditype 0 and type 1 are supported*.apeapeapeSupported “Video” File Formats
File ExtensionContainerVideo CodecResolutionFrame Rate (fps)Bit Rate (Mbps)Audio Codec*.avi*.mkv*.asf*.wmv*.mp4*.3gp*.vro*.mpg*.mpeg*.ts*.trp*.mov*.flv*.vob*.svi*.m2tsAVIMKVASFMP43GPMOVFLVVROTSSVAFDivx 3.11/ 4 / 5 / 61920 x 1080(WMV v7, v8, MSMPEG4 v3 1280 x 720)6~3030AC3LPCMADPCM (IMA, MS)AACHE-AACWMADD+MPEG(MP3)MPEG SP/ASPH.264 BP/MP/HPMotion JPEGMicrosoft MPEG-4 v3Windows Media Video v7, v8, v9MPEG2MPEG1VP6640 x 4804MVC24/25/3060*.webmWebMVP81920 x 10806~3020Vorbis*s4udTSH.2643840 x 216024/25/30AC3 -
Flash Drive for VIZIO TV
MP4 format: encode the video file should be H.264, and the audio codec should be AAC. -
USB Drive for TCL TV
Supported USB devices formats: FAT16, FAT32, NTFS, EXT2, EXT3, or HFS+.
Supported Media Types:
Video – H.264/AVC (.MKV, .MP4, .MOV)
Audio – AAC (.MKV, .MP4, .MOV); MP3(.MP3, .MKV); WMA (.ASF, .WMA, .MKV), FLAC (.FLAC, .MKV), PCM (.WAV, .MKV, .MP4, .MOV), AC3/EAC3 (.MKV,.MP4. .MOV, .AC3), DTS (.MKV, .MP4, .MOV,.DTS), ALAC (.MKV, .MP4, .MOV, .M4A)
*4K Video – H.265/HEVC (.MKV, .MP4, .MOV); VP9 (.MKV)
Playlists –.M3U, .M3U8
Image – JPG, PNG, GIF (non-animated)
* H.265/HEVC supported only on Roku devices that support 4K.
-
Hope it helps. If the issue remains, please check the manual or site of the TV manufacturer. Please feel free to write to us about your experience on this issue, to help us get more on-site experience to share with the other users.
T9: USB fails on USB speakers, TVs, car stereos, printers, media players, sewing machines
Standard USB drives are compatible with a wide range of devices, including USB speakers, TVs, car stereos, printers, media players, and even sewing machines. However, if your USB drive isn’t functioning properly with a specific device, follow these steps to troubleshoot:
- Test the USB Drive on a Computer: Verify that the USB drive is working correctly by connecting it to a computer. Ensure the files on the drive are accessible and free of errors.
- Consult the Device Manufacturer: If the USB drive works on a computer but not with your device, check with the manufacturer of the USB device for the following details:
- Supported USB File Systems: Determine which file system formats (e.g., FAT32, FAT, exFAT, NTFS) the device supports.
- Supported File Formats: Identify the document or media file types (e.g., MP3, MP4, JPEG, PDF) compatible with the device.
- Maximum Capacity Limit: Confirm if there is a maximum storage capacity that the device can recognize (e.g., 32GB, 64GB).
By verifying these compatibility factors, you can pinpoint and resolve issues, ensuring smooth functionality between your USB drive and the device.
T8: Drives for embroidery sewing machine
Please verify the capacity limit and file format compatibility of your sewing machine directly with the manufacturer. This information will help ensure that your USB drive is fully compatible and can function seamlessly with the device.
T7: Flash Drive for Printers
Choosing Flash Drive for Printers
Some rule to follow when using thumb drives with printers.
- Always format using FAT32 option
- Ensure that thumb drive does not have too many extra files that are not relevant to printing. When you connect the thumb drive to the printer, it is read by the printer and the supported files are searched which may take a long time otherwise.
- Connect the thumb drive directly to the printer USB port. Don’t use a HUB for example.
T4: USB Not Detected on Mac
Commonly, when you insert a USB drive in the USB port on a Mac computer, the drive will soon appear on the desktop or hide in the Finder, letting you access, view, and manage data on it. If you come across the situation that no matter how many times you try to connect the USB drive with a Mac computer, the USB drive is not showing up anywhere, please try with below methods.
Fix 1. Check USB port. Change the USB-to-Mac connection port.
Fix 2. Change settings for Mac detecting an external hard disk on the desktop
Occasionally, your Mac has already recognized the USB flash drive but not shown it on the desktop. Thus, you should go to Finder > Preferences > General and make sure the “External disks” option is ticked. Then you’ll see the USB flash drive showing up on Mac desktop.

Fix 3. Change settings for Mac recognize an external hard disk in the Finder
Finder is the other access for us to check a connected external drive on Mac. If your flash drive or external hard drive is not showing up there, go to Finder > Preferences > Sidebar, and under Locations, you need to tick the option “External disks”. By selecting this option, we can make sure that the connected external USB hard drive or flash drive will normally show up in the Finder.

Fix 4. Check the USB drive in System Information
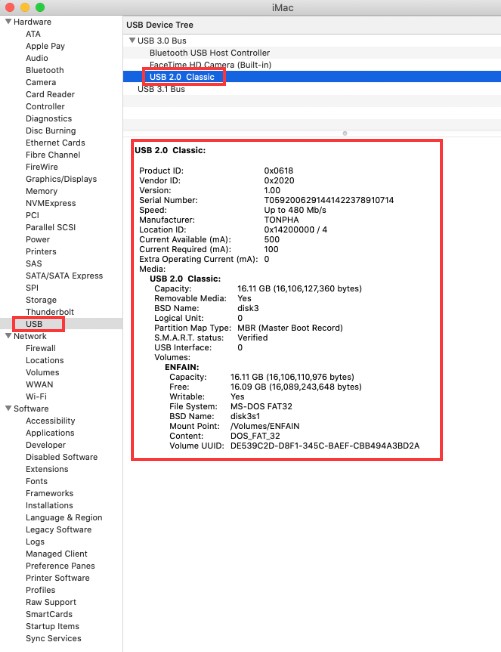
When you cannot find the USB drive on the desktop or in the Finder, try to look for it in the System Information section, which is usually a hidden place for average Mac users.
Step 1. Go to Applications > Utilities > System Information.

Step 2. Check if the system detects the USB drive. Click “USB” on the left panel, and you can also check the USB flash drive information.
Fix 5. Reset USB ports on Mac to detect a USB drive
Step 1. Restart Mac computer, press the Command +Option+P+R keys until the Apple logo appears.
Step 2. Press Command+Option+Esc keys to close all applications that are not responding.
Step 3. Plug the USB which is not showing up to your Mac computer. If it doesn’t show up, click Apple icon and select “Sleep”.
Step 4. Wake up the computer after a few seconds by pressing any key.
Step 5. Shut down the Mac, unplug the power cord, reattach it after 15 seconds.
Fix 6. Repair USB flash drive with First Aid if it doesn’t show up.
Step 1. Go to Applications > Utilities > Disk Utility.

Step 2. Select USB flash drive on the left panel of Disk Utility, and click “First Aid” at the top toolbar and click “Run”. Disk Utility will repair any errors on the drive automatically.

Step 3. Select the USB drive and click “Unmount” at the top toolbar, unplug the USB and plug it back in 10-15 seconds.
Fix 7. Check and fix errors in a not recognized USB with Terminal
Step 1. Open Terminal in Utilities, type: diskutil list and press Return.

Step 2. Find the disk number of your USB flash drive, type: diskutil info disk3 and press Return. (Replace 3 with the disk number of your USB flash drive.)

Step 3. Type: diskutil eject disk3 and press Return. (Replace 3 with the number of your USB.)

Step 4. Type: diskutil list and press Return. When the USB disappear from the Terminal list, close the window.
Step 5. Close Terminal and open Console to inspect your drive errors.

Step 6. Click “Errors and Faults” to check if there are any errors.

Step 7. Reconnect your USB flash drive back to Mac, if no error shows up, your USB flash drive is safe.
T6: DYI Music USB on Cars
Workable USB drives on computers fails to play DIY playlist in car’s system (head unit)
A lot of users use the USB drive to store music/ tracks from iTune/ the computer and play it on vehicles. Sometimes it happens that the tracks are saved on the flash drive but fails to play on the cars. I would suggest the users who ‘d like to make a DIY playlist on cars, please learn the following points:
- Normally computer reads FAT32/ exFAT/ NTFS, but a lot of car USB reads FAT32 only.
- Computer reads more formats of music while cars read MP3 format generally.
- Some head units comes with maximal readable memory size limit up to 4GB capacity.
If you have already come across issues with playing tracks on a car, here are some troubleshooting steps to resolve this:
1. Check the USB Format
- FAT32 is generally compatible, but some car systems prefer exFAT or NTFS.
- Try reformatting the drive to exFAT:
- Back up your data.
- Format the drive to exFAT using a computer.
- Reload the music files.
2. File and Folder Compatibility
- Ensure your music files are in a supported format (MP3, WMA, or AAC are common for Ford’s system).
- Avoid deeply nested folders. Organize files in a simple structure:
- Example:
Root Folder > Artist > Album > Song.mp3
- Example:
3. Check File Size and Metadata
- Some systems have limits on file size or may struggle with music files with very long names or complex metadata. Try renaming files to simpler titles.
4. Update Your System
- Check if your Ford’s infotainment system has a software update available and install it.
5. Test with a Different USB
- Use a different USB drive with similar music files to rule out issues with the flash drive itself.
6. Check Owner’s Manual
- Your car’s manual should list the exact specifications and requirements for USB drives and music files.
T5: Use “ REGEDIT” to set/ cancel “ Write-Protect”
- Plug USB
- Press ” Win + R “
- Imput ” regedit” and RUN
- Go to HKEY_LOCAL_MACHINE\SYSTEM\Current\ControlSet\Contro
- Create a new entry and name it “StorageDevicePolicies”
- Create a new DWORD 32 digits and name it “WriteProtect“
- Open “WriteProtect” and change the data to “1” and Save
T3: Drive Detected But Not Accessible On Windows
If a drive is detected but not showing up on Desktop nor in My Computer, Please follow below solutions:
Method 1. Reassign a new drive letter to the USB
- Press “Windows + R” simultaneously, input “diskmgmt.msc” and hit “Enter” to open Disk Management.

- Locate the USB disk partition, right click it and choose “Change Drive Letter and Path…”.

- In the pop-up window, click “Change” and assign a new drive letter to the partition.
Always remember that you must assign the name which is not being used by any other drive.

Once drive letter name changed, your USB drive will show up in My Computer and you will able to access data from it. If not then reboot your system and then check.
Method 2. Run CHKDSK to ensure there is no bad sectors on the USB
If the USB flash drive is corrupted or there are some bad sectors on it, then you could not access it, either. However, you can try to run CHKDSK to fix it.
- Click the Search box, type “cmd”, right click Command Prompt icon and select “Run as administrator”.
- In the Command Prompt window, type “chkdsk g: /f /r /x” and press “Enter” (where the “g” stands for the drive letter of your USB flash drive.)

Method 3. Reformat the USB to a compatible file system
If your USB is formatted to be Ext2/3/4 file system, then you be unable to open it in “My Computer”. That’s because the Ext file system is not compatible with Windows operating systems. So you need to reformat it to other compatible file systems, like FAT32, NTFS, exFAT. You can format it in Disk Management.
Warning: since formatting will erase all data stored in the USB drive, please back up your data before formatting.
T2: Use the drive on both Mac & Windows
Solution: Format the flash drive as exFAT or FAT32
WARNING: Backup all your data before formatting. Formatting will erase all data on the memory device.
Formatting a flash drive to exFAT or FAT32 on a Windows computer
- Double-click My Computer, or Computer
- Right-click the drive letter associated with your memory device, then select Format
WARNING: Make sure you select the correct drive letter.
- Select a File systemtype. – exFAT
- Ensure “Quick Format” is checked
- Click Start.
Formatting a flash drive to exFAT or FAT32 on a Mac computer
- Open Disk Utility.
- In the top menu bar, go to View, and choose Show All Devices
- Select the upper level of the drive you would like to format and click the Erase button
- Choose how you would like to format the drive
-
- Enter a Name for your drive
- Choose exFAT for the format
- Choose Master Boot Record for the Scheme
- Click Erase
- When finished, the drive will be formatted and repartitioned successfully. Click the Done button
T1: Transfer a 4GB or larger file to USB drive
Due to FAT32 limitation, files larger than 4GB can NOT be stored on a FAT32 volume. Formatting the flash drive as exFAT or NTFS will resolve this issue. Please make sure to backup the data before reformatting.
WARNING: Backup your data. Formatting will delete all the data in your device.
SOLUTION 1 – Format in exFAT
exFAT file system that allows a single file larger than 4GB to be stored on the device. This file system is also compatible with Mac.
Windows 7 and Mac OS 10.6.6 and higher are compatible with exFAT out of the box. Older operating systems may need a patch installed for exFAT compatibility.
NOTE: exFAT file system is NOT compatible with some host devices such as TV, game systems, older operating systems, car stereos etc.
Formatting a drive in exFAT
- Double-click on My Computer.
- Right-click on the flashdriveor memory card, then select Format.
- In the File Systemlist, click exFAT.
- Click Start.
- Click OKto start formatting.
SOLUTION 2 – Format in NTFS
WARNING:
– Formatting the device as NTFS will make it unwriteable on a Mac computer. Most Mac computers can read NTFS, but not write.
– NTFS is a journaled file system, this creates more read/write activities. Therefore, it MAY decrease life expectancy of your device.
– Once the device is formatted as NTFS, you MUST use “Safely Remove Hardware” to remove your device.
STEP 1 – Optimize the flash drive for performance
- Plug in the device to the PC.
- Open The ComputerManagement Console
- On the Left side select Device Manager
- On the right side expandDisk Drives
- Right-click on the flashdrive, then select Properties.
- Click the Policytab.
- Select Optimize for performance, then click OK.
STEP 2 – Format the flash drive
- Double-click My Computer.
- Right-click on the flashdrive, then select Format.
- In the File systemlist, click NTFS.
- Click Start.
- Click OKto start formatting.