Commonly, when you insert a USB drive in the USB port on a Mac computer, the drive will soon appear on the desktop or hide in the Finder, letting you access, view, and manage data on it. If you come across the situation that no matter how many times you try to connect the USB drive with a Mac computer, the USB drive is not showing up anywhere, please try with below methods.
Fix 1. Check USB port. Change the USB-to-Mac connection port.
Fix 2. Change settings for Mac detecting an external hard disk on the desktop
Occasionally, your Mac has already recognized the USB flash drive but not shown it on the desktop. Thus, you should go to Finder > Preferences > General and make sure the “External disks” option is ticked. Then you’ll see the USB flash drive showing up on Mac desktop.

Fix 3. Change settings for Mac recognize an external hard disk in the Finder
Finder is the other access for us to check a connected external drive on Mac. If your flash drive or external hard drive is not showing up there, go to Finder > Preferences > Sidebar, and under Locations, you need to tick the option “External disks”. By selecting this option, we can make sure that the connected external USB hard drive or flash drive will normally show up in the Finder.

Fix 4. Check the USB drive in System Information
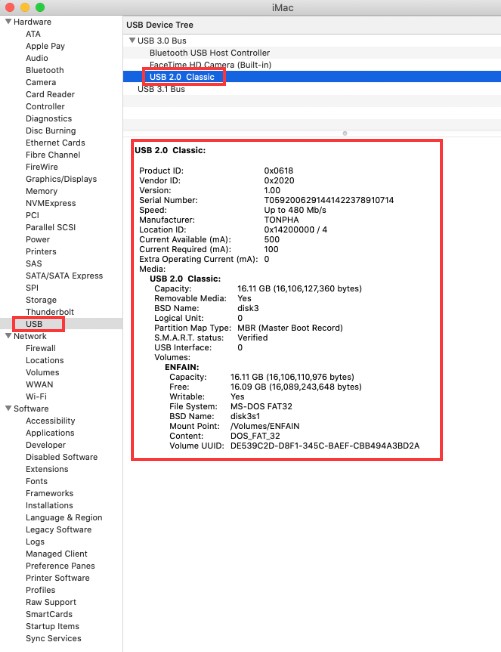
When you cannot find the USB drive on the desktop or in the Finder, try to look for it in the System Information section, which is usually a hidden place for average Mac users.
Step 1. Go to Applications > Utilities > System Information.

Step 2. Check if the system detects the USB drive. Click “USB” on the left panel, and you can also check the USB flash drive information.
Fix 5. Reset USB ports on Mac to detect a USB drive
Step 1. Restart Mac computer, press the Command +Option+P+R keys until the Apple logo appears.
Step 2. Press Command+Option+Esc keys to close all applications that are not responding.
Step 3. Plug the USB which is not showing up to your Mac computer. If it doesn’t show up, click Apple icon and select “Sleep”.
Step 4. Wake up the computer after a few seconds by pressing any key.
Step 5. Shut down the Mac, unplug the power cord, reattach it after 15 seconds.
Fix 6. Repair USB flash drive with First Aid if it doesn’t show up.
Step 1. Go to Applications > Utilities > Disk Utility.

Step 2. Select USB flash drive on the left panel of Disk Utility, and click “First Aid” at the top toolbar and click “Run”. Disk Utility will repair any errors on the drive automatically.

Step 3. Select the USB drive and click “Unmount” at the top toolbar, unplug the USB and plug it back in 10-15 seconds.
Fix 7. Check and fix errors in a not recognized USB with Terminal
Step 1. Open Terminal in Utilities, type: diskutil list and press Return.

Step 2. Find the disk number of your USB flash drive, type: diskutil info disk3 and press Return. (Replace 3 with the disk number of your USB flash drive.)

Step 3. Type: diskutil eject disk3 and press Return. (Replace 3 with the number of your USB.)

Step 4. Type: diskutil list and press Return. When the USB disappear from the Terminal list, close the window.
Step 5. Close Terminal and open Console to inspect your drive errors.

Step 6. Click “Errors and Faults” to check if there are any errors.

Step 7. Reconnect your USB flash drive back to Mac, if no error shows up, your USB flash drive is safe.