Please verify the capacity limit and file format compatibility of your sewing machine directly with the manufacturer. This information will help ensure that your USB drive is fully compatible and can function seamlessly with the device.
Category: Troubleshooters
T7: Flash Drive for Printers
Choosing Flash Drive for Printers
Some rule to follow when using thumb drives with printers.
- Always format using FAT32 option
- Ensure that thumb drive does not have too many extra files that are not relevant to printing. When you connect the thumb drive to the printer, it is read by the printer and the supported files are searched which may take a long time otherwise.
- Connect the thumb drive directly to the printer USB port. Don’t use a HUB for example.
T4: USB Not Detected on Mac
Commonly, when you insert a USB drive in the USB port on a Mac computer, the drive will soon appear on the desktop or hide in the Finder, letting you access, view, and manage data on it. If you come across the situation that no matter how many times you try to connect the USB drive with a Mac computer, the USB drive is not showing up anywhere, please try with below methods.
Fix 1. Check USB port. Change the USB-to-Mac connection port.
Fix 2. Change settings for Mac detecting an external hard disk on the desktop
Occasionally, your Mac has already recognized the USB flash drive but not shown it on the desktop. Thus, you should go to Finder > Preferences > General and make sure the “External disks” option is ticked. Then you’ll see the USB flash drive showing up on Mac desktop.

Fix 3. Change settings for Mac recognize an external hard disk in the Finder
Finder is the other access for us to check a connected external drive on Mac. If your flash drive or external hard drive is not showing up there, go to Finder > Preferences > Sidebar, and under Locations, you need to tick the option “External disks”. By selecting this option, we can make sure that the connected external USB hard drive or flash drive will normally show up in the Finder.

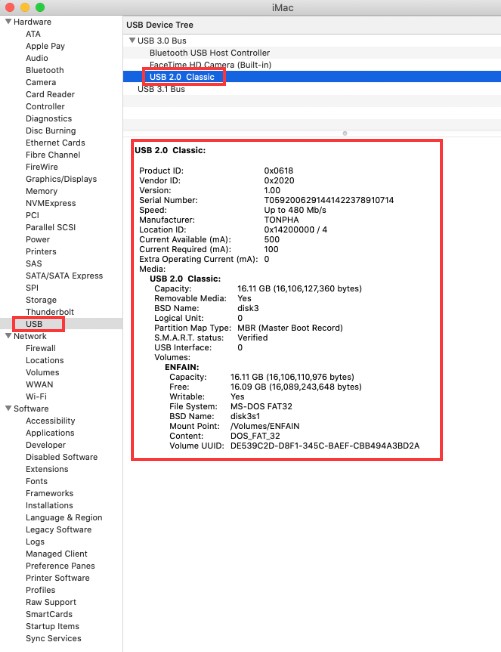
Fix 4. Check the USB drive in System Information
When you cannot find the USB drive on the desktop or in the Finder, try to look for it in the System Information section, which is usually a hidden place for average Mac users.
Step 1. Go to Applications > Utilities > System Information.

Step 2. Check if the system detects the USB drive. Click “USB” on the left panel, and you can also check the USB flash drive information.
Fix 5. Reset USB ports on Mac to detect a USB drive
Step 1. Restart Mac computer, press the Command +Option+P+R keys until the Apple logo appears.
Step 2. Press Command+Option+Esc keys to close all applications that are not responding.
Step 3. Plug the USB which is not showing up to your Mac computer. If it doesn’t show up, click Apple icon and select “Sleep”.
Step 4. Wake up the computer after a few seconds by pressing any key.
Step 5. Shut down the Mac, unplug the power cord, reattach it after 15 seconds.
Fix 6. Repair USB flash drive with First Aid if it doesn’t show up.
Step 1. Go to Applications > Utilities > Disk Utility.

Step 2. Select USB flash drive on the left panel of Disk Utility, and click “First Aid” at the top toolbar and click “Run”. Disk Utility will repair any errors on the drive automatically.

Step 3. Select the USB drive and click “Unmount” at the top toolbar, unplug the USB and plug it back in 10-15 seconds.
Fix 7. Check and fix errors in a not recognized USB with Terminal
Step 1. Open Terminal in Utilities, type: diskutil list and press Return.

Step 2. Find the disk number of your USB flash drive, type: diskutil info disk3 and press Return. (Replace 3 with the disk number of your USB flash drive.)

Step 3. Type: diskutil eject disk3 and press Return. (Replace 3 with the number of your USB.)

Step 4. Type: diskutil list and press Return. When the USB disappear from the Terminal list, close the window.
Step 5. Close Terminal and open Console to inspect your drive errors.

Step 6. Click “Errors and Faults” to check if there are any errors.

Step 7. Reconnect your USB flash drive back to Mac, if no error shows up, your USB flash drive is safe.
T6: DYI Music USB on Cars
Workable USB drives on computers fails to play DIY playlist in car’s system (head unit)
A lot of users use the USB drive to store music/ tracks from iTune/ the computer and play it on vehicles. Sometimes it happens that the tracks are saved on the flash drive but fails to play on the cars. I would suggest the users who ‘d like to make a DIY playlist on cars, please learn the following points:
- Normally computer reads FAT32/ exFAT/ NTFS, but a lot of car USB reads FAT32 only.
- Computer reads more formats of music while cars read MP3 format generally.
- Some head units comes with maximal readable memory size limit up to 4GB capacity.
If you have already come across issues with playing tracks on a car, here are some troubleshooting steps to resolve this:
1. Check the USB Format
- FAT32 is generally compatible, but some car systems prefer exFAT or NTFS.
- Try reformatting the drive to exFAT:
- Back up your data.
- Format the drive to exFAT using a computer.
- Reload the music files.
2. File and Folder Compatibility
- Ensure your music files are in a supported format (MP3, WMA, or AAC are common for Ford’s system).
- Avoid deeply nested folders. Organize files in a simple structure:
- Example:
Root Folder > Artist > Album > Song.mp3
- Example:
3. Check File Size and Metadata
- Some systems have limits on file size or may struggle with music files with very long names or complex metadata. Try renaming files to simpler titles.
4. Update Your System
- Check if your Ford’s infotainment system has a software update available and install it.
5. Test with a Different USB
- Use a different USB drive with similar music files to rule out issues with the flash drive itself.
6. Check Owner’s Manual
- Your car’s manual should list the exact specifications and requirements for USB drives and music files.
T5: Use “ REGEDIT” to set/ cancel “ Write-Protect”
- Plug USB
- Press ” Win + R “
- Imput ” regedit” and RUN
- Go to HKEY_LOCAL_MACHINE\SYSTEM\Current\ControlSet\Contro
- Create a new entry and name it “StorageDevicePolicies”
- Create a new DWORD 32 digits and name it “WriteProtect“
- Open “WriteProtect” and change the data to “1” and Save